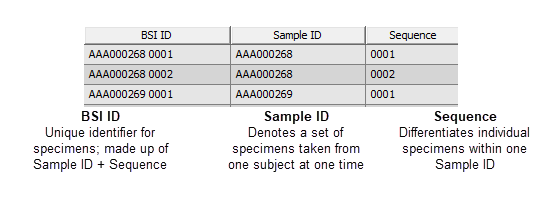
BSI IDs are a unique identifier for individual specimens (vials) within your database. BSI IDs are comprised of two components: Sample ID and Sequence. The Sample ID denotes a set of specimens taken from one subject at one time. Because multiple specimen records can have the same Sample ID, Sequences must be unique within each Sample.
BSI ID Components

Use the Assign BSI IDs tool to generate Sample IDs and Sequence Numbers for vials in an Add batch. New vials are assigned unused Sample IDs within a specified range and Sequence Numbers starting at a specified value. Vials containing identical values for a specified field (Grouping Fields) are grouped together with the same Sample ID. When a different value for the specified field is reached a new Sample ID is used for vials with the new value and Sequence Numbers are assigned to those vials sequentially, starting with the specified start value.
Once IDs have been assigned, they will automatically be reserved for the batch. The IDs will remain as reserved until the batch is committed or deleted. IDs can be manually unreserved.
In a Data Entry Add batch, using this tool to update Sample IDs can cause already entered sample level data to be updated. If this would happen, then a Sample Data Changed! dialog will open. The dialog shows the changes which will be made and provides an option to continue with the change, or to cancel the change. The ability to continue with changing Sample data on this dialog is controlled by a permission, so if a user does not have this permission, the button to continue will not be active.
To assign BSI IDs:
- Create or open an existing Add batch.
- Save the batch (required for new unsaved Add batches; optional for other batches).
- Select the row(s) to which to assign BSI IDs.
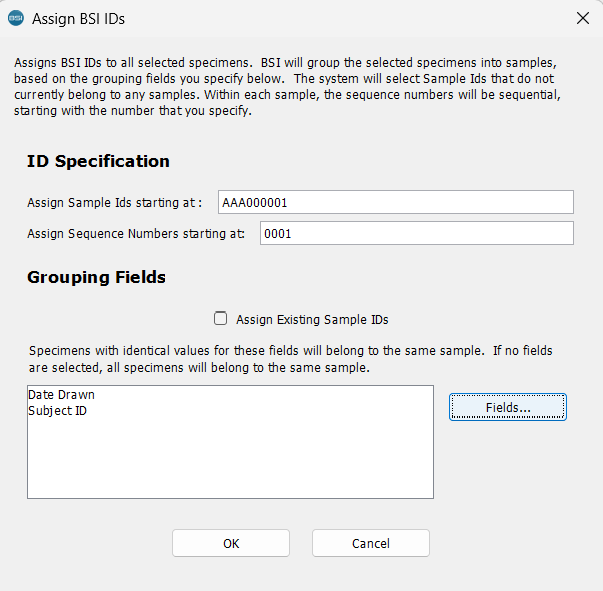
- Select Assign BSI IDs from the Tools menu. The Assign BSI IDs dialog will appear.
 Under ID Specification, enter a value for:
- Assign Sample IDs starting at: Sample ID.
- Assign Sequence number starting at: starting Sequence number.
- In some cases, you may want to assign new specimens into an existing Sample ID in the system. To do so, check the Assign Existing Sample IDs checkbox.
- In the Grouping Fields section, select fields to group Sample IDs by first pressing the Fields button. A Select Sample Fields dialog will appear.
- Once the starting Sample ID, starting Sequence number, and grouping field(s) have been selected, press the OK button. Sample IDs, Sequence numbers and BSI IDs will be generated for the selected rows.