Project groups are used to assign roles to a set of users, send a notification, and assign an issue to an entire group of users. For example, an issue could be assigned to a group of quality assurance users for testing, then whichever team member has time to complete the task first can begin testing it.
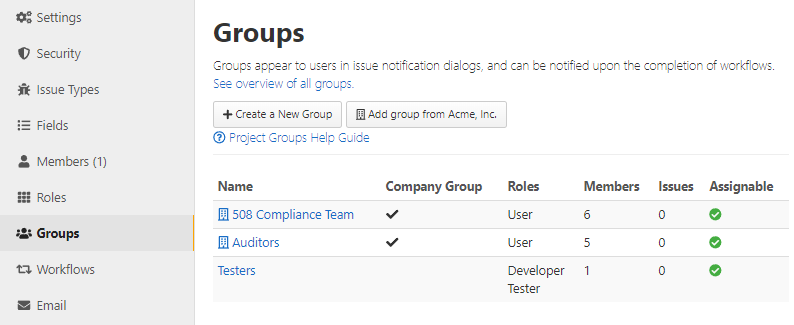
Click Admin > Groups to access the Project Groups page. On this page, a list of groups available for the project shows the following information:
- Name – The group’s name.
- Company Group – A checkbox is displayed if the group is managed by the company. The group name, badges, and member list are not editable.
- Roles – Roles that have been assigned to this group.
- Members – A count of the members in the group.
- Issues – A count of issues currently assigned to this group.
- Assignable – A checkbox is displayed if the group can be assigned issues.
Additionally, you can click the See overview of all groups link to view all users that are assigned to all groups in the projects.
Creating groups
- From the Project Groups page, click on Create a New Group to add a group.
- Enter a name for the group and any badge text that should appear next to the name of the group's members.
- The Assignable box is checked by default. Uncheck the box if the group will be excluded from selection for the Assign To field.
- Select the members you would like to include in the group from the dropdown list. A keyword filter is available to narrow the number of members displayed. The list of members may be filtered to show users fitting each of the following criteria: o Initial – users included in this group before the edit page was opened.
- All – all users.
- Selected – all users who will be included in this group after the Save Changes button is selected.
- Not Selected – all users who will not be included in this group after the Save Changes button is selected.
- Additions – all new users who be included in this group after the Save Changes button is selected.
- Removals – all users who will not be included in this group anymore after the Save Changes button is selected.
- Changes – all changes made to users in this group since the last save.
- If desired, check the Hide members box to hide the members of this group from non-Project Administrators.
- Select any Roels that should be automatically assigned to members of this group.
- Click Create Group.
Editing groups
You can view the members of a group and edit the group by clicking the group name on the Groups page. Make changes to the Name, Badges, Assignable, or Hide Members fields as needed. Check the box next to a project member's name to add them to the group or uncheck the box to remove them from the group. Click Update Group to save the changes.
Some fields are not editable for company-wide groups.
Adding Company-wide Groups
You can add a Company-wide group to the project using the Add group from [project name] button. This page lists the Company-wide Groups that are not already assigned to the current project, as well as the group members and projects it is already in use for. To add one, check the box next to it and select any roles to be applied to this group’s members, if needed. Click the Assign Selected Groups to Project button.
Note: If group members are added or removed by a Company Administrator, that change will be reflected in all projects using that group. When a member is removed from a group, project membership will also be removed only if they do not have any individual roles, they are not a member of another group in the project, and they were originally added via that group. Project Administrators will receive an email notification when those changes occur.
Deleting groups
Delete groups by opening the Groups screen, then click on the group you want to remove. The editing screen will open and you can select the Delete Group button. Then click Delete Group on the page to confirm. Click Cancel to not delete the groups.