Workflows are customized actions a member can perform on issues matching a certain criterion. For each workflow, you can determine the issue criteria which will make it available and the fields which can be updated during the completion of the workflow. There is a role permission which ensures that a user can only update issues via an existing workflow. This way, it is possible to enforce that certain things are done to an issue when updating it and that they are done in the correct order.
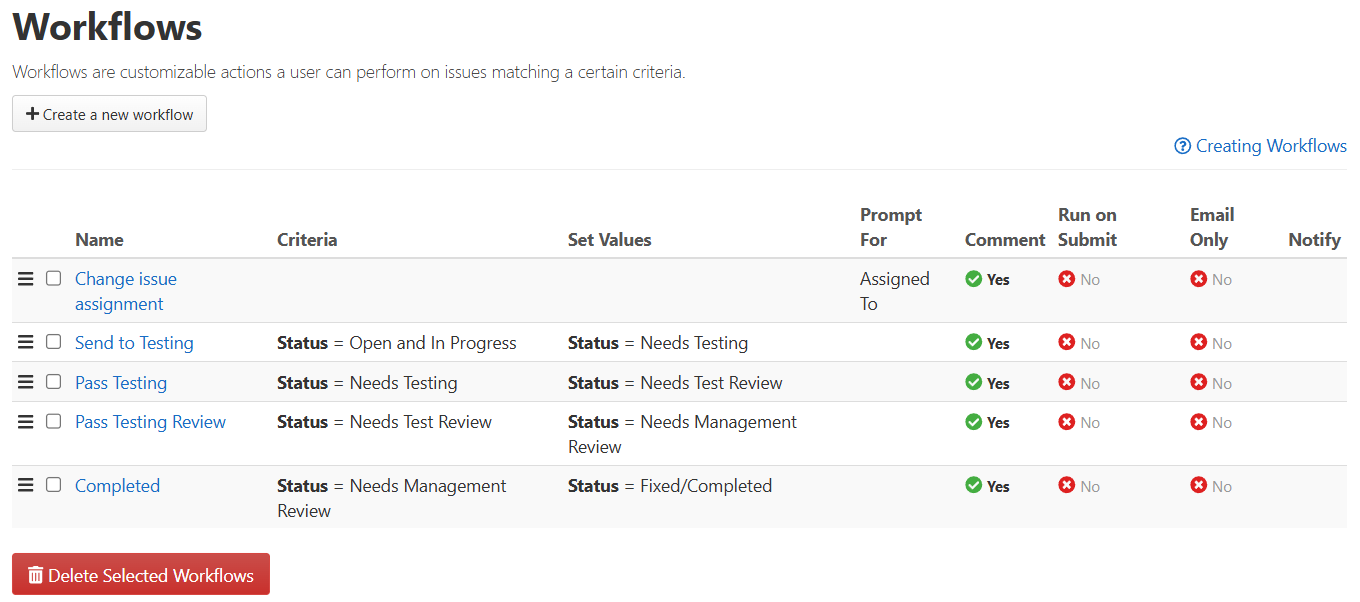
Click Admin > Workflows to access the Workflows screen. On this screen the properties of each existing workflow are displayed, including workflow name, criteria, set values, prompt for, own issues only, comment, run on submit, email only, and notify.
Workflows are automatically added in alphabetical order. To rearrange the order they are shown in, both on the Workflows page and the workflows dropdown menu, select the move icon (three lines) next to the workflow you want to move and drag it to a new location.
To add a new workflow:
- Click Create a new workflow near the top of the Workflows screen. The New Workflow screen will open where you can define properties for the workflow.
- Give the workflow a descriptive name. Enter instructions for the workflow.
 If desired, mark the following checkboxes:
- Show this workflow as a button at the top of issues - Displays the workflow (when it is available to the viewing user) as a button at the top of the issue, instead of under a workflows dropdown menu. If this box is unchecked, the workflow will always appear under the Workflows dropdown menu.
- Execute the workflow when an issue matching the criteria is submitted - Automatically executes the workflow when specific criteria are met on initial issue submission.
- Execute this workflow automatically when an issue is updated to match the criteria - Automatically executes the workflow when specific criteria are met on issue update
- Only execute this workflow when submitting via email - This workflow is only available when the user is submitting via an email.
- Select the roles for which you want the workflow to be available. This field is ignored for workflows executed on submission or update.
- Select the fields from the Prompt Variables dropdown list which will be available for he user to update when executing the workflow.
- Check the box next to Prompt the user for comment (and attachments) to make a comment field available to the user when executing this workflow. If unchecked, the workflow will only show the Prompt Variables. If unchecked and no Prompt Variables are displayed from step 5 above, the workflow will execute automatically without giving the user an opportunity to update anything in addition to the workflow's automatic updates.
- Select groups which should be notified when this workflow is completed from the Notify dropdown list. To use a workflow for notifications only, add the desired group(s) here and do not add anything in the Assign Values section below.
- Click Save Workflow and Add Criteria. An Edit screen opens to allow you to assign criteria under which the workflow will be used.
- The workflow will be created and available to view, edit, and delete from the workflows screen.
- The page will refresh and two new options will be available: Criteria and Assign Values.
- In the Criteria section, select the field value requirements that must be met in order for the workflow to automatically execute or be available to users. To set Criteria, first select a variable from the drop-down box.
- Fields available for selection will include the following types: lookup, boolean, integer, user list, multi-value lookup, checklist, and multi-user list.
- In the Value(s) column, either select a value(s) or manually enter a value(s) which should make this workflow available.
- Multi-choice fields will be displayed three times in this drop down, once for each type of operator to be used with the field:
- Is Exactly – Only the exact combination of values will be used as criteria
- Contains Any – Any of the selected values will suffice for this workflow to apply
- Contains All – All of the selected values must be present for this workflow to apply.
- For the Status field, both “(Active)” and “(Resolved)” are available for selection.
- If you would like to add more criteria, click the Add Criteria button. Another row is added to the Criteria table. Keep adding until all of your criteria are added.
- To delete a criteria from the workflow, select the Remove button next to that criteria.
- If the workflow should only be available to the currently assigned user, then add the Assigned To field as a criteria with “(Current User)” as the value.
- Assign Values are what will be filled in automatically when the workflow is executed. To set an Assign Value, first select a variable from the drop-down box.
- Fields available for selection will include the following types: text, lookup, boolean, integer, date (excluding non-editable date fields), user list, multi-value lookup, URL, checklist, and multi-user list.
- In the Value(s) column, if there is a drop-down box, select a value. If not, type the value into the field.
- For the Assign To field, in addition to specific users the drop down also includes the option to assign to the current user, the previous user, or the issue's submitter.
- If you would like to add another assign value, click Add Value. Another row is added to the Assign values table. Keep updating until all of your assign values are added.
- To delete an assign value from the workflow, select the Remove button next to that value.
- When you are finished, click Update Workflow.