To modify or activate/deactivate user accounts:
- Click Admin > Users on the Company navigation bar.
- Click the name of the user you want to edit.
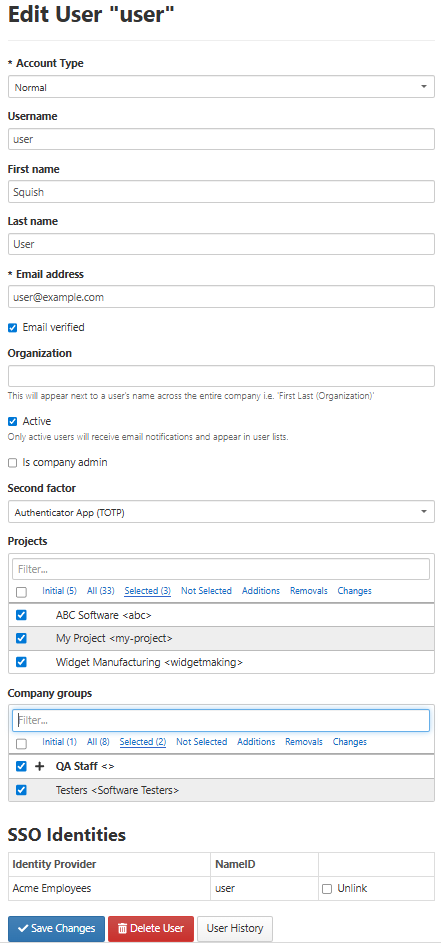
- Make any changes. Editing user information can include:
- Editing profile information such as: Account Type, Username, First name, Last name, Email address, or Organization.
- Changing the user's company administrator permission by toggling the Admin checkbox.
- Activate or deactivate the user's account by toggling the Active checkbox.
- Second Factor – Require this user to login using a second authentication method.
- Resetting the user's password by entering a temporary password in the New and Verify password fields. These fields are disabled for Service accounts.
- Changing access to projects by checking/unchecking them from the Projects field. A keyword filter is available to narrow the number of projects displayed. The list of projects may be filtered to show projects fitting each of the following criteria:
- Initial – projects the user had access to before the edit page was opened.
- All – all projects.
- Selected – all projects the user will have access to after the Save Changes button is selected.
- Not Selected – All projects the user will not have access to after the Save Changes button is selected.
- Additions – all new projects the user will have access to after the Save Changes button is selected.
- Removals – all projects the user will be removed from after the Save Changes button is selected.
- Changes – all changes made to accessible projects since the last save.
- Changing the Company Groups to which this account is assigned. A keyword filter, similar to the one available for project access above, is available.
- If your company subscribes to SSO, assign the user's SSO identity provider and the unique identifier for their account with that provider. If the account already has SSO information saved, there is a checkbox to unlink it from their account.
- For Service accounts only, available API keys will be displayed, along with links to the API documentation.
- Delete a user who has never logged onto Squish by clicking the Delete User button.
- This option is only available if the user has never interacted with Squish.
- Click Save Changes.
Note: For Service accounts only, an API Key is displayed and obfuscated. Click the Show Key button to remove obfuscation and Hide Key to reapply the obfuscation. If needed, you can use the Regenerate Private Key button to generate a new private key for this account. A confirmation prompt will open. A link to relevant API documentation is also provided.
To delete user accounts:
- Click Admin > Users on the Company navigation bar.
- Click the name of the user you want to delete.
- Select the Delete User button.
To reset a user’s password:
A password can only be reset for users who are not configured to login via SSO.
- Click Admin > Users on the Company navigation bar.
- Click the name of the user for whom you want to change the password.
- Select the Set a new password for this user button.
- Enter your login credentials.
- If you login via SSO, then you will be redirected to your identity provider’s login page.
- If you login directly through Squish, then a form will open prompting you to enter your password.
- Enter the new password to assign, then verify the password. The new password must meet the password complexity requirements for your company.
- Select Submit.
To unlock an account after bad password attempts:
- Click Admin > Users on the Company navigation bar.
- Accounts that are locked due to too many bad password attempts are displayed with a lock icon next to the username. Click the name of the user.
- Select the Reset Password Attempts button.
Note: When a user has been made inactive all of the entries made under that username are retained. Only accounts that have never logged in are allowed to be deleted so that information is not lost.
Viewing Account History:
From the Edit User page, Company Administrators can view the history related to a given account. Captured history includes all user field changes with old and new values (password changes will be indicated but values not shown), the user that made the change, and a timestamp for when the change was made. Account history includes all field value, project membership, and group membership.
To view an account’s history:
- Click Admin > Users, and select a user to open the Edit User page.
- Select the User History button at the bottom of the page.
- A pop up will open displaying each change chronologically from oldest to newest. A Print button is available at the top of the dialog to export data.